There is a Saying out that there that is “ If it is too loud you are too old”
Well with that Said you are never too young for what I have up for review; for I have the
legendary horn blasters horn kit. This kit when it first arrived at the shop was in a
small light box. With huge print on the side of the box that read “HORNBLASTERS.COM”
As if to hint to the greatness within.
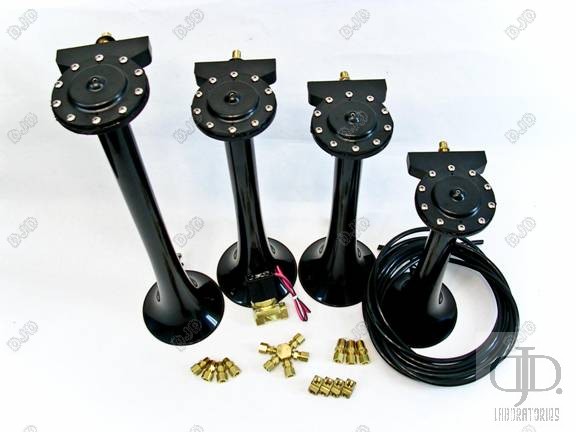
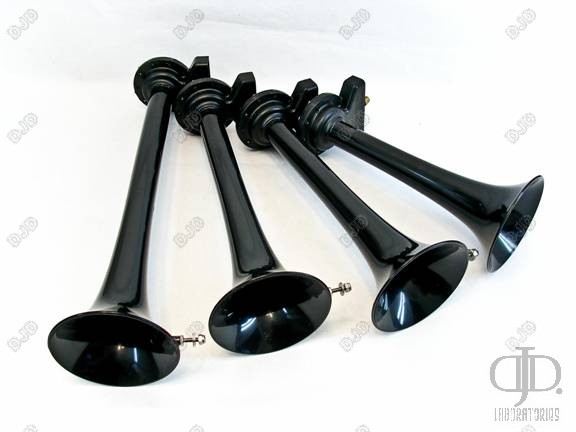
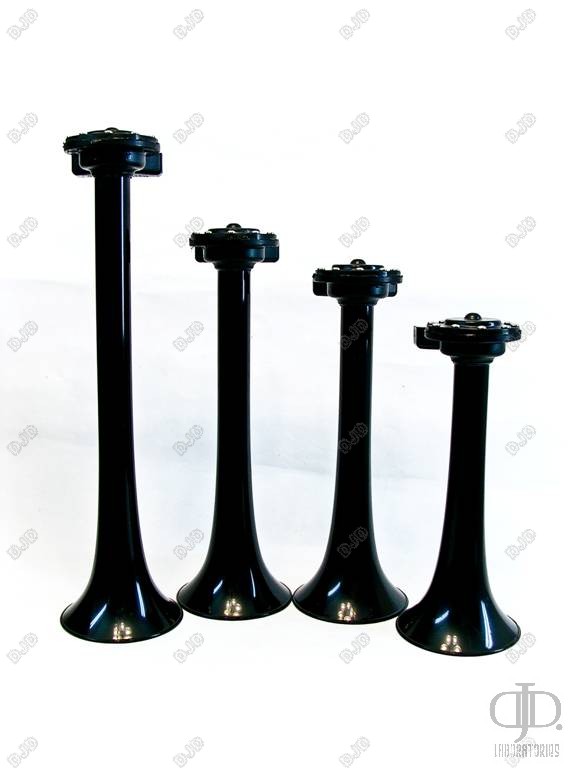
When I opened the box I was greeted with 4 very large black horns. And a small bag with
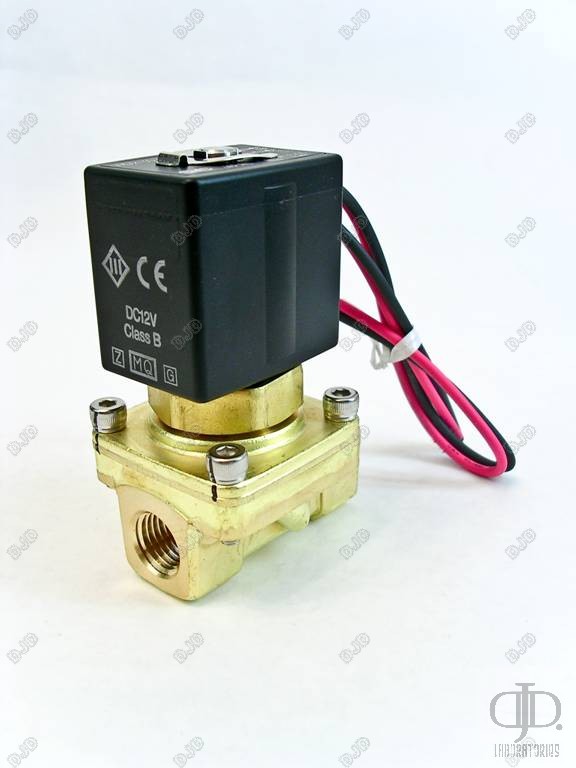
all kinds of fittings. Also in the box was a smaller box with an SMC valve.
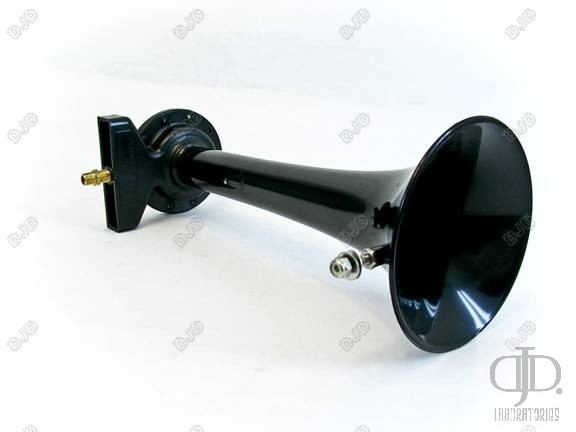
First impressions of the horns I was shocked that they where plastic! But the more I worked
with them the more I have grown to like the fact that they are indeed plastic.
The horns have a smooth almost glossy texture. They are very thick rigid plastic similar
to the plastic used on Street Scene side view mirrors.
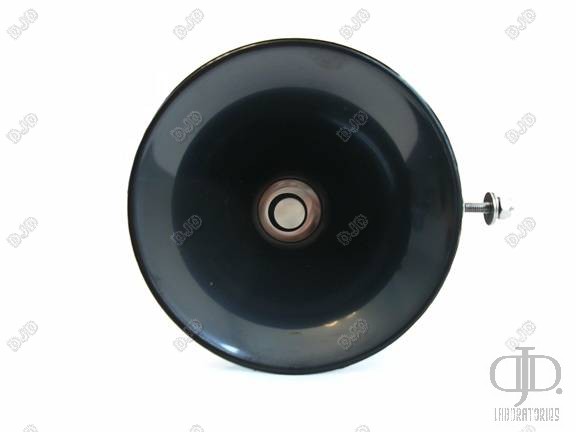
The back side of the horn has more screws holding the stainless diaphragm
in place then any other I have seen.
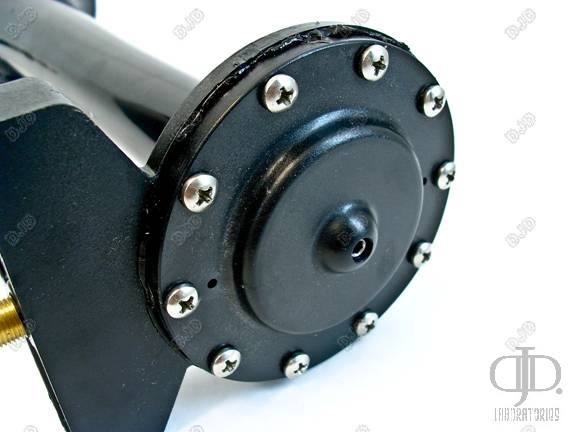
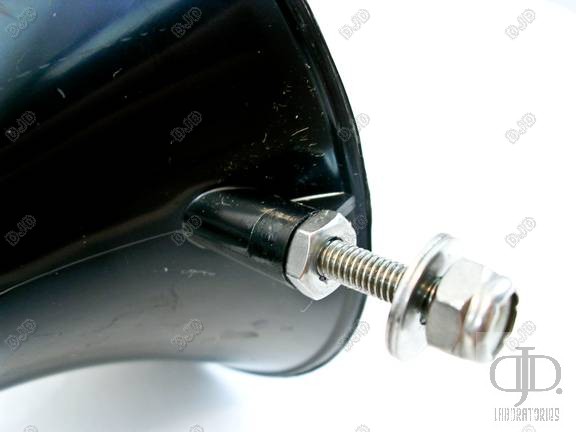
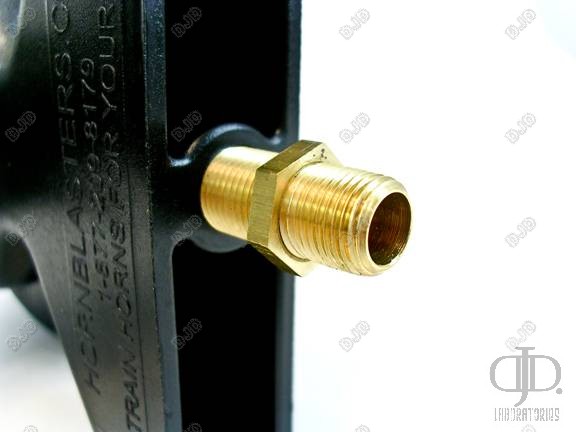
Every point of mounting on the horn is reinforced with thicker material. On every horn
there are (2) points of contact for mounting. First is the Air fitting with a large flat
mounting flange. Second is the Front or end of the Horn with a single molded in bolt with a nylock fastener.
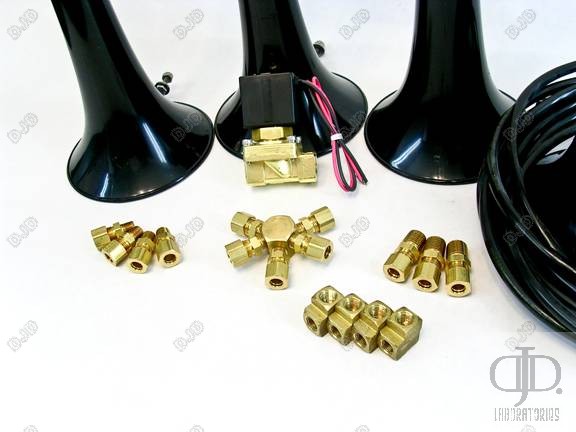
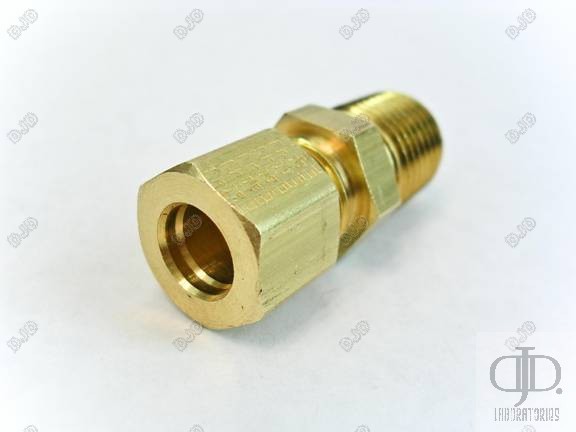
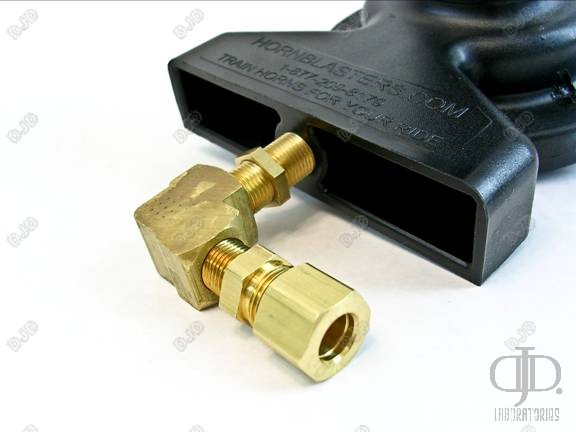
The pounds of brass fittings that come with the kit are quite extensive and
allow for a variety of mounting options.
For my test I opted to mount the horns on the front of my truck between the grill and the
radiator pointing straight down at the ground. Starting at the tank I installed the included
¼” NPT line fitting and then ran the line along the frame up to the front of the truck.
Next I then used the also included fitting to connect the supply line to the valve that was
mounted on the core support. One thing worth mentioning here. If you mount the valve
at the tank the horn will have a slight delay from when you press the button until you
hear anything. As with when you let go the horn will bleed off slightly after you let go.
This may be a desirable trait. For it makes it sound similar to a real train with a
tapered start and stop. I chose to mount my valve close to the horns
for rapid action of the horn. Nice quick snap on and off to the sound. This allows you to
get more of the ‘scare’ factor if you will. NOTE: with the valve mounted so far from
the tank the entire line that goes from the tank to the valve has full tank pressure
all of the time. So make very sure the line is free from abrasion and heat. For if
anything where to happen to the line the tank would empty.
From the valve I then ran the rest of the line adapter fittings from the valve to the
horn line. After mounting the horns I made a point to mount the ‘spider’ manifold
central to the horns. For to get a clean uniform sound you will want all of the line
to be as close to the same length as possible. For each horn will fire at the same time and at the same level.
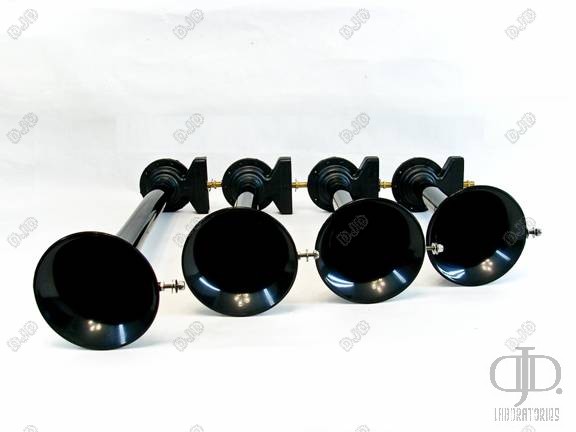
It is worth mentioning the very unique spider manifold assembly.
For I have never used such a fitting before.
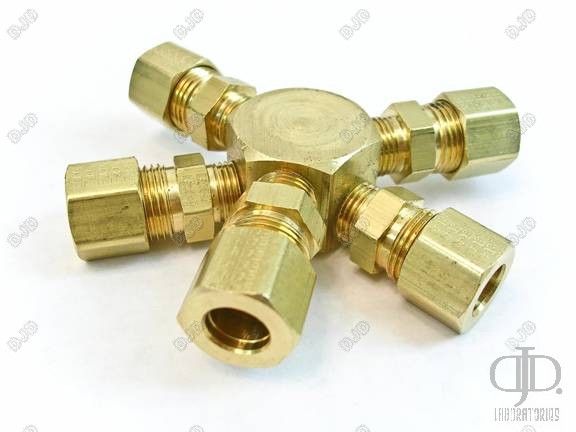
I recommend measuring all of your lines and cut them to length. Put the manifold into
a vice and connect all of the lines to it first, then to the Valve and horns. For there is no
easy way to get leverage on the manifold when it is installed to properly seat the compression rings.
Once setup I filled the tank back up to 200PSI and then hit the horn button, I was in
no way shape or form prepared for what was to come out of those horns! Words can not
describe the sheer verbosity of there output. The amazing part is something so loud
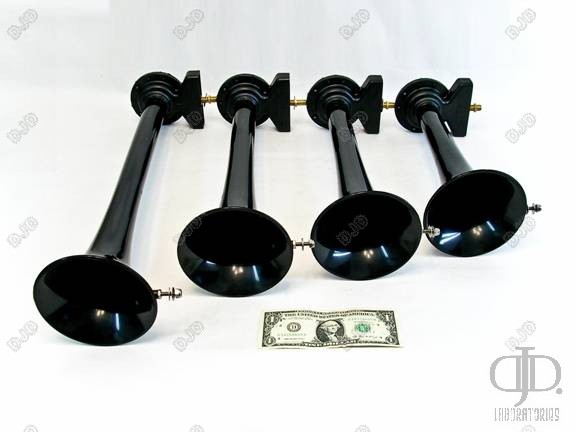
can sound so good! It may be the fact that this horn is a full octave yes (4) horns.
Most ‘train’ horns on the market are the (3) chime models. And there trumpets
are shorter in length then those of the hornblaster kit.
The sound that echoed through the valley was a full rich chest shaking blow. In
many ways it sounded better then that of a train! To put this to a test I slammed
the door fired up the truck and drove straight away to the local switch yard. After
sitting there for only 40min. the first train passed, as he honked his horn I immediately
replied back with mine. The look on the conductors face was priceless, after a hearty
grin, he honked back. ( I felt the connection haha) In my mind I felt this kit
really was louder then that of the commercial locomotive!
Now for the next 3 hours I proceeded to drive around like a mad man praying for
someone to cut me off or just do something that would require me to honk at them.
Ever watch the Videos on horblasters.com? Watching peoples reactions seemed
almost fake. I can reassure you there is no better documentation then that.
To a ‘T’ people jump or duck for cover like there life depended on it. NOTE: word
of caution, I used to own the old ‘3 chime’ train horn and would honk
it all the time in the tunnels. My first run through the tunnels with the new
horns. Left me with a horrible ringing in my ears for hours. Not to mention the
congestion it generated as people slowed down trying to figure out where the hell a train was in the tunnel.
Installation was a breeze and everything you need to complete the installation is included in the kit.
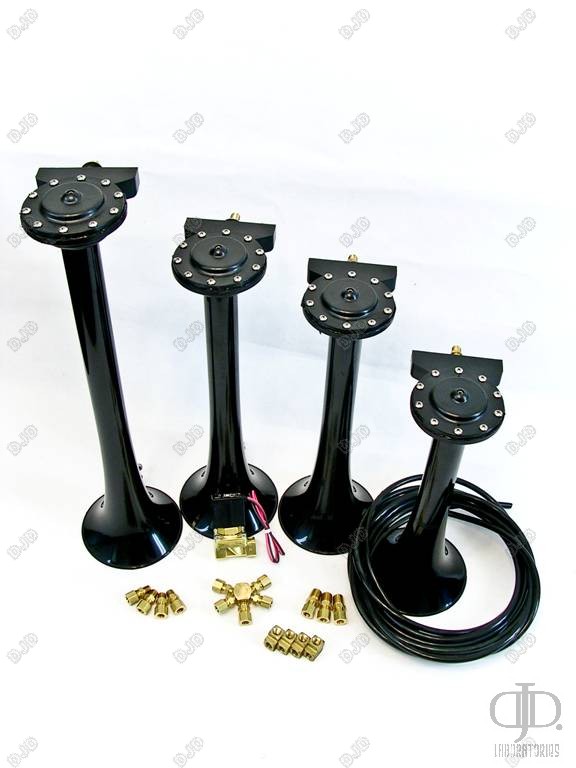
The only thing I want to mention is you do have a limited amount of air line and you
need to keep this in mind when you plan on where you want to install your kit.
I found I had just the right amount of line needed for my
install and that was for an extended cab truck.
Before you purchase the kit measure out the run of line using rope or twine to get
the exact length you need. Don’t forget to allow for the manifold and the 4 runs
of lines to the horns. If you need more then the included line be sure to ask when
you purchase your kit for it is not a common line size so make sure you have enough before you get started.
This brings me to the last point the fittings are compression sleeve style this
means that once the fitting is ‘compressed’ that is it, you can remove and
replace the line, but the compression sleeve can only be used once. So make
absolutely sure you have everything where you want it before you tighten everything down.
About quality, you would think a plastic horn kit would not be about quality, you could
not be father from the truth this kit was well designed to use top quality
components for the utmost in reliability.
The time tested SMC valve will never give you any trouble even in the colder
climates for its design allows for high pressure and high reliability.
The fittings are all machined brass and everything is clean cut and well
finished. All mounting hardware is high quality and fits well together.
The horns being plastic has one great advantage, no rust! They will not
dent or ding, and you will not get that metal harshness that comes with most
metal horns, it is a trailing harmonic of the main tone that resonates in the horn tube itself.
What made me look into the horn blasters kit? Well, I was at a local show
when a friend of mine pulled up next to me and honked his new horn. After
I climbed down off my head rest I asked him what the hell was that? …
and where can I get one? After he told me to check out hornblasters.com I was sold!
Ever been to a huge show and everyone is honking there horns? Know that one
that kills them all? Yup that is this horn! I can not begin to explain the difference
between the off the shelf ‘train’ horn that you find on ebay and in most stores.
Yes it is loud and big but it is a squeeze horn in comparison to what hornblasters has developed.
I have also included in a first ever for one of my reviews a Video showing side
by side the normal ‘train horn’ in comparison to the hornblasters kit. As you can tell there is no comparison.
Still no video can do these justice you will have to take my word on this!
Overall I give these horns a 10 out of 10 for I have not found a single flaw or
problem with them and the sheer excitement I get from every time I honk my horn is priceless!
Cheers.
Doug


Hello, I hope the translator works. I’m a fan of hornblasters but never heard shocker xl in person. I want these for my motorcycle, currently I have four tow horns attached to a 1/2 inch solenoid (similar to shocker setup) at 145psi. I’m undecided because I don’t know if there is much difference compared to mine. I’ve seen all the videos on youtube and hornblasters and yes, many people get scared and jump, but there are others who don’t react and it’s like they don’t feel anything. My big question is: will it scare away the biggest dogs? my horns scare away medium and small dogs, people within 15 meters get scared, but big dogs get more angry and if people are more than 20 meters away they don’t get so scared. Greetings and excellent review.
Good afternoon! The Translation was perfect! If you head over to my in-depth review here. https://www.djdlabs.com/horns/ Go to page #3 sound clips, you can hear for yourself what they sound like. They will rattle your chest! They have a very imposing sound, that makes even people used to them jump! Any questions let me know!